Sunday, November 28, 2010

Quick guide for installing Zimbra 6 on Centos 5

Today, I'm gonna share how to setup a basic Mail Server using Zimbra and Webmin for a quick DNS setup.

Zimbra is an excellent alternative for MS Exchange server and the best thing is... it has an Open Source edition, that means, it's free.
I'm gonna give credit to Wyatt Walter from his guide which is the basis for my DNS setup.

Disclaimer: This guide is for testing and educational purposes only. This guide is not meant for a live production environment.

For my setup:
  • I'm using a Centos 5.5 machine that is not optimized in Zimbra. (has sendmail, Apache, bind etc. on it)
  • DSL connection with DHCP. Boo!
  • A modem/router that sets up to routing mode.
  • My local pc has a 192.168.1.36 static IP assigned.
  • Internal DNS.
Setup DNS using Webmin:

1. Zimbra requires that you have a working DNS record. We gonna need Webmin for Centos to setup a basic A (IPv4 Address) and MX (Mail Exchange) record.

Webmin is a web-based configuration utility on Linux. I used Webmin version 1.520 for this guide.

  • Make sure you have bind installed by:
    #rpm -qa | named
bind-libs-9.3.6-4.P1.el5_4.2
ypbind-1.19-12.el5
bind-utils-9.3.6-4.P1.el5_4.2
bind-chroot-9.3.6-4.P1.el5_4.2
bind-9.3.6-4.P1.el5_4.2

#chkconfig named on
#service named start
2. Once installed, you can access it through your favorite browser and type the address 'https://localhost:10000'. Webmin usually listens to port 10000.

You can also use https://127.0.0.1:10000 or https://youripaddress:10000

3. On the log-in screen. Enter any root account (usually root) and the root password.
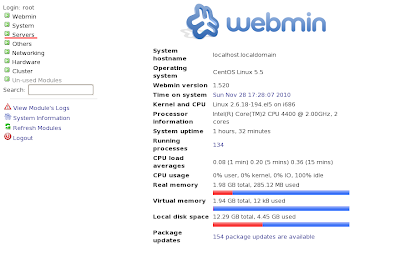


4. After logging-in. Click servers and then BIND DNS server:
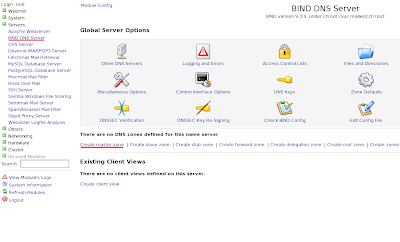


5. Then click Create master zone:
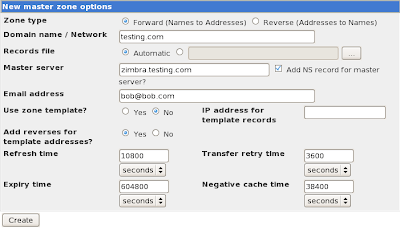


3 required fields:
domain name / Network: testing.com
Master server: zimbra.testing.com
Email address: bob@bob.com

You can input your desired input on these fields.

Everything else is default. Make sure you have those filled in then click Create.

6. You will be redirected to the Edit Master Zone, Click Address.
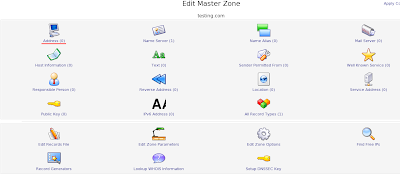


7. On the Add Address Record, enter your master server name and then your machine's IP address.
  • You can verify your IP address by typing on to the console:
#ifconfig


And then click Create, then click Return to record types.

8. On the Edit Master Zone, click Mail Server.


On the Add Mail Server Record, you can leave the Name blank and the Mail Server to your FQDN. Enter 10 on Priority.

on my example, I used zimbra.testing.com.

Click Create and then click Return to record types.

9. On the Edit Master Zone, click on Apply Configuration.

make sure you started bind.


and we're done on the DNS part.

When installing Zimbra Open Source, it will look to the /etc/hosts file if it is properly configured with your IP address and FQDN.

To properly set-up your FQDN on /etc/hosts...

#vi /etc/hosts

# Do not remove the following line, or various programs
# that require network functionality will fail.
127.0.0.1 localhost.localdomain localhost
::1 localhost6.localdomain6 localhost6
192.168.1.36 zimbra.testing.com zimbra
  • You should add lines like these: IP address FQDN hostname
  • Then save.
Now on to /etc/resolv.conf

#vi /etc/resolv.conf

nameserver 192.168.1.36
  • You can enter your machine's IP address after nameserver.
After setting those up you can check if your DNS records are working fine.

#dig testing.com MX

; <<>> DiG 9.3.6-P1-RedHat-9.3.6-4.P1.el5_4.2 <<>> testing.com MX
;; global options: printcmd
;; Got answer:
;; ->>HEADER<<- opcode: QUERY, status: NOERROR, id: 10332 ;; flags: qr aa rd ra; QUERY: 1, ANSWER: 1, AUTHORITY: 1, ADDITIONAL: 1 ;; QUESTION SECTION: ;testing.com. IN MX ;; ANSWER SECTION: testing.com. 38400 IN MX 10 zimbra.testing.com. ;; AUTHORITY SECTION: testing.com. 38400 IN NS zimbra.testing.com. ;; ADDITIONAL SECTION: zimbra.testing.com. 38400 IN A 192.168.1.36 ;; Query time: 0 msec ;; SERVER: 192.168.1.36#53(192.168.1.36) ;; WHEN: Sun Nov 28 18:59:54 2010 ;; MSG SIZE rcvd: 82 #dig testing.com any

; <<>> DiG 9.3.6-P1-RedHat-9.3.6-4.P1.el5_4.2 <<>> testing.com any
;; global options: printcmd
;; Got answer:
;; ->>HEADER<<- opcode: QUERY, status: NOERROR, id: 36853 ;; flags: qr aa rd ra; QUERY: 1, ANSWER: 3, AUTHORITY: 0, ADDITIONAL: 1 ;; QUESTION SECTION: ;testing.com. IN ANY ;; ANSWER SECTION: testing.com. 38400 IN SOA zimbra.testing.com. bob.bob.com. 1290931620 10800 3600 604800 38400 testing.com. 38400 IN NS zimbra.testing.com. testing.com. 38400 IN MX 10 zimbra.testing.com. ;; ADDITIONAL SECTION: zimbra.testing.com. 38400 IN A 192.168.1.36 ;; Query time: 1 msec ;; SERVER: 192.168.1.36#53(192.168.1.36) ;; WHEN: Sun Nov 28 19:00:43 2010 ;; MSG SIZE rcvd: 126

#nslookup zimbra.testing.com

Server: 192.168.1.36
Address: 192.168.1.36#53

Name: zimbra.testing.com
Address: 192.168.1.36

Now on to the Zimbra part!

Setting up Zimbra Open Source Edition:

1. Download the latest Zimbra open source edition at http://www.zimbra.com/downloads/os-downloads.html

or direct link here.

2. Untar.

#tar -xvzf zcs-6.0.9_GA_2686.RHEL5.20101115233426.tgz
#cd zcs-6.0.9_GA_2686.RHEL5.20101115233426
3. Make sure sendmail and apache are stopped. (also dovecot or imap, afaik)

#chkconfig sendmail off #chkconfig httpd off #service sendmail stop #service httpd stop

4. If all works fine, we proceed to the installation, so I'm assuming that we're on the untarred directory of zimbra.

#./install.sh --platform-override

platform override option is for installing Zimbra on a CentOS machine.

5. After that, there will be some message initializing the installation and inspecting your machine. You will be prompted to agree on the license agreement. Just type 'y'.

6. Then it will check for prerequisite packages. If there will be packages not installed you can exit the installation and proceed to install those missing packages.

e.g.

#yum install sysstat
After installing the necessary packages you can revert back to previous step 4.

7. Moving forward, you will be prompt to install:

Install zimbra-ldap [Y] y

Install zimbra-logger [Y] y

Install zimbra-mta [Y] y

Install zimbra-snmp [Y] y

Install zimbra-store [Y] y

Install zimbra-apache [Y] y

Install zimbra-spell [Y] y

Install zimbra-memcached [N] y

Install zimbra-proxy [N] y
Just type 'y' and you will again be prompted to install on a CentOS machine (definitely yes).

8. On this time, the major installation will start and will finish just a couple of minutes.

after that, there would be an error regarding DNS resolving.

DNS ERROR resolving It is suggested that the hostname be resolveable via DNS Change hostname [Yes] y Please enter the logical hostname for this host zimbra.testing.com
Enter 'y' and I typed my FQDN which is zimbra.testing.com and then hit enter.

Yet another DNS error will show up (regarding MX records)


DNS ERROR resolving MX for zimbra.testing.com It is suggested that the domain name have an MX record configured in DNS Change domain name? [Yes] y Create domain: [zimbra.testing.com] testing.com

Just type 'y' and change domain. Mine is testing.com

9. Next, Zimbra will try to detect if there are services that are using the ports needed by Zimbra applications.

If everything else works just fine. You will be prompted to change the admin password.


This will be indicated by * (asterisk). If there are several asterisk indicated, there might be problem on your setup.

1) Common Configuration:
2) zimbra-ldap: Enabled
3) zimbra-store: Enabled
+Create Admin User: yes
+Admin user to create: admin@testing.com
******* +Admin Password UNSET
+Enable automated spam training: yes
+Spam training user: spam.nawjnedgk@testing.com
+Non-spam(Ham) training user: ham.d2q7jnymr@testing.com
+Global Documents Account: wiki@testing.com
+SMTP host: zimbra.testing.com
+Web server HTTP port: 80
+Web server HTTPS port: 443
+Web server mode: http
+IMAP server port: 7143
+IMAP server SSL port: 7993
+POP server port: 7110
+POP server SSL port: 7995
+Use spell check server: yes
+Spell server URL: http://zimbra.testing.com:7780/aspell.php
+Enable version update checks: TRUE
+Enable version update notifications: TRUE
+Version update notification email: admin@
+Version update source email: admin@

4) zimbra-mta: Enabled
5) zimbra-snmp: Enabled
6) zimbra-logger: Enabled
7) zimbra-spell: Enabled
8) zimbra-proxy: Enabled
9) Default Class of Service Configuration:
r) Start servers after configuration yes
s) Save config to file
x) Expand menu
q) Quit

Choose 3 for zimbra-store then 4 for admin password.

Type the new password for the admin and when finished, type 'r' to return to menu then type 'a' to apply settings.

You will be prompted again with questions. Just agree on that.

10. After configuring the password, it will continue with the setup. Wait a several minutes then you will be prompted again:


Notify Zimbra of your installation? [Yes] n Notification skipped

Just type 'n' to skip notification.

11. Then it will initialize the servers and proceed to the post installation procedures.

If you have prompted on failed zimlets installation i.e.


Installing common zimlets... com_zimbra_cert_manager...done. com_zimbra_url...failed. This may impact system functionality. com_zimbra_ymemoticons...done. com_zimbra_email...failed. This may impact system functionality. com_zimbra_date...done. com_zimbra_adminversioncheck...done. com_zimbra_dnd...failed. This may impact system functionality. com_zimbra_phone...failed. This may impact system functionality. com_zimbra_bulkprovision...done.

You can install this on the admin page after. Then you will be prompted that the installation is done.

Configuration complete - press return to exit

12. And now you're done with the installation. Now you can access the admin page through your favorite browser and type the address https://zimbra.testing.com:7071 or https://localhost:7071 or https://youripaddress:7071.
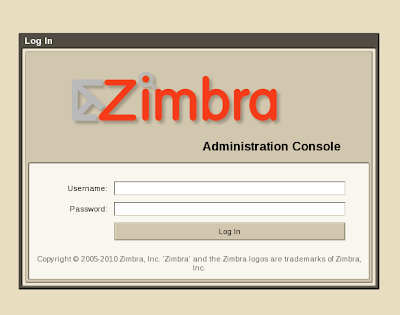


Then enter the username (default is admin) and then the password you supplied earlier.
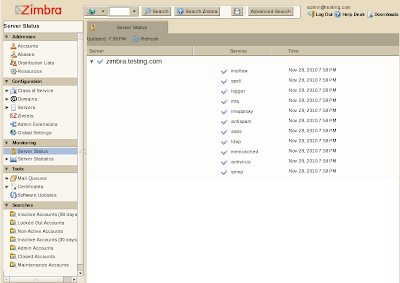


If you can't access the admin page, probably Apache is running. Just stop the service and restart.

You can also access the web client interface. Just replace the https to http i.e. http://zimbra.testing.com

Done. ^_^

Let me know if I miss something. Cheers!
Friday, September 17, 2010

Setting up an NFS server for CentOS

These steps show how to setup a basic NFS server for CentOS.

For the NFS Server side:

1. Make sure you've installed NFS server by typing on the terminal:

  • rpm -qa | grep nfs
This will show:
nfs-utils-lib-1.0.8-7.6.el5
nfs-utils-1.0.9-44.el5
system-config-nfs-1.3.23-1.el5
  • chkconfig --level 35 nfs on
  • service nfs start


2. Go to System>Administration>Server Settings> NFS

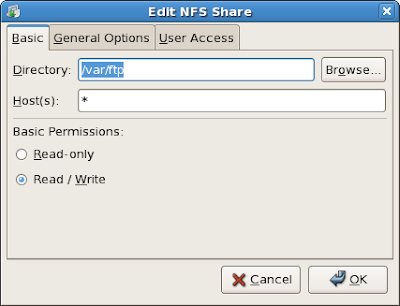
3. Click Add:


  • in my example, I chose /var/ftp as the directory which I will share for the network and * for hosts (this will accept all client, best practice is enter the specific ipaddr and netmask e.g. 192.168.0.1/255.255.255.0) for testing purposes only.
  • On User Access tab choose Treat remote root user as local root.
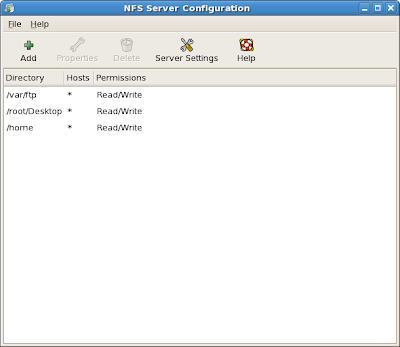
4. After that, this will show...


note: I also added some directories.

5. Now, on the tricky part...

NFS has a dynamic port assigned by the portmap... (so what does that mean?) You'll have difficulty filtering those port on the firewall.

So to do that ->

  • gedit /etc/sysconfig/nfs
  • uncomment or remove the # sign on these port configuration
LOCKD_TCPPORT=32803
LOCKD_UDPPORT=32769
MOUNTD_PORT=892
RQUOTAD_PORT=875
STATD_PORT=662
STATD_OUTGOING_PORT=2020
  • Then save.
6. Restart the services

  • service nfs restart
  • service portmap restart
note: check if the port was used by typing "rpcinfo -p"

7. We're nearly done, now on to the firewall. Type on to the terminal "gedit /etc/sysconfig/iptables" and add these to filter those port that we just enabled.

-A RH-Firewall-1-INPUT -s 112.203.69.110/255.255.128.0 -m state --state NEW -p udp --dport 111 -j ACCEPT
-A RH-Firewall-1-INPUT -s 112.203.69.110/255.255.128.0 -m state --state NEW -p tcp --dport 111 -j ACCEPT
-A RH-Firewall-1-INPUT -s 112.203.69.110/255.255.128.0 -m state --state NEW -p tcp --dport 2049 -j ACCEPT
-A RH-Firewall-1-INPUT -s 112.203.69.110/255.255.128.0 -m state --state NEW -p tcp --dport 32803 -j ACCEPT
-A RH-Firewall-1-INPUT -s 112.203.69.110/255.255.128.0 -m state --state NEW -p udp --dport 32769 -j ACCEPT
-A RH-Firewall-1-INPUT -s 112.203.69.110/255.255.128.0 -m state --state NEW -p tcp --dport 892 -j ACCEPT
-A RH-Firewall-1-INPUT -s 112.203.69.110/255.255.128.0 -m state --state NEW -p udp --dport 892 -j ACCEPT
-A RH-Firewall-1-INPUT -s 112.203.69.110/255.255.128.0 -m state --state NEW -p tcp --dport 875 -j ACCEPT
-A RH-Firewall-1-INPUT -s 112.203.69.110/255.255.128.0 -m state --state NEW -p udp --dport 875 -j ACCEPT
-A RH-Firewall-1-INPUT -s 112.203.69.110/255.255.128.0 -m state --state NEW -p tcp --dport 662 -j ACCEPT
-A RH-Firewall-1-INPUT -s 112.203.69.110/255.255.128.0 -m state --state NEW -p udp --dport 662 -j ACCEPT
  • First, change the ipaddr and netmask specified to your Server IP address. In my example I used 112.203.69.110/255.255.128.0 as my Server IP address.
  • Second, add these lines before the...
-A RH-Firewall-1-INPUT -j REJECT --reject-with icmp-host-prohibited
  • Save and restart iptables services by typing "service iptables restart"
8. We're done. Disabling the firewall will be much lesser work because you don't have to do Step 5 up to the firewall settings.

Now on to the Client Side:

1. There's no daemon to start nfs client. Just make a directory on to the /mnt by typing "mkdir /mnt/nfs" (on this example I use nfs, you can enter whatever name here).

2. Then mounting the folder...

  • type "mount -t nfs 112.203.69.110:/var/ftp /mnt/nfs"
  • This will mount the shared folder by the server.
3. For troubleshooting,

  • make sure that you can see the portmap on the server by "rpcinfo -p 112.203.69.110" (or the IP address of your server).
  • Repeat Step 5.
  • make sure that there's no typo.
  • disable the firewall.
4. Done.

Please let me know if you have any questions or any non-violent inputs :). Cheers!


Friday, September 3, 2010

Installing alsa-driver in CentOS

First, I can assure you that linux is effin not driver friendly especially in Enterprise versions such as RHEL and CentOS. So let's get things started.

1. Make sure you have the SBx00 Azalia (Intel HDA) by typing at the terminal -> 'lspci | grep Audio' (case sensitive w/o the quote).

Having this audio device esp. in laptops, have high possibility that your experiencing no audio on the speaker, mic is not working or headphone jack doesn't work either. Editing the /etc/modprobe.conf and adding to the option line "model='whatever model alsa said on its website doesn't work either'".

If you manage to have a workaround on this without doing the next step. Please let me know.

2.If you tried mixing up the settings in 'alsamixer' and still no luck, go fire up the terminal and 'cd' to '/etc/yum.repos.d'.

3. Type 'touch ATrpms.repo'. Then 'gedit ATrpms.repo' for easier editing.

4. Copy and paste this to the file and save.

[atrpms]
name=EL $releasever - $basearch - ATrpms
baseurl=http://dl.atrpms.net/el$releasever-$basearch/atrpms/stable
gpgkey=http://ATrpms.net/RPM-GPG-KEY.atrpms
gpgcheck=1
enabled=1
exclude=*kmdl*i586*
includepkgs=*alsa*

5. Copy paste to terminal:

rpm --import http://ATrpms.net/RPM-GPG-KEY.atrpms

6. 'yum install alsa-driver'

7. This will install 2 additional packages, the kml and the kernel update. After install, reboot.

8. You may also want to include the 'kernel-devel' and 'kernel-headers' just incase you will rebuild any device conflicts on the kernel update. (e.g. my fglrx driver for ATI)

9. After reboot, you can notice now that there's a headphone volume and addtl mic volume.

Cheers!


Saturday, August 28, 2010

Atheros AR8151 driver for CentOS

I just bought a Gateway ECN1301i laptop (o yeah!) and I just thought, I should install a CentOS Linux into it. But when the time I "lspci" and checked for network connection, I found out that both wired and wireless devices aren't installed yet.

I googled and search about for 4-5 painstakingly hours, and when I about just to give up... I almost forgot that this device is using the "atl1e" driver ->

Which was on my previous post. So heres the link -> http://elrepo.org/linux/elrepo/el5/i386/RPMS/

kmod-atl1e-1.0.1.9-1.el5.elrepo.i686.rpm

This will just saves you from compiling those linux driver available from atheros website.


Monday, July 19, 2010

Atheros L1 Gigabit Ethernet driver for CentOS

Err, it's been awhile since I last posted here, I'd been busy pursuing my undergrad course on Technological University of the Philippines. Since I've got most of the time on our home, I've decided to install "again" CentOS (5.5) to my desktop and configure a LAMP server.

Unfortunately, my desktop PC is equipped with P5L-MX motherboard that has a built-in Atheros LAN NIC that doesn't automatically installed on CentOS.

Here, I found a site that has the kmod-atl1 driver for my NIC. 

Just a quick reference for me in-case I've forgot where the heck could it be.

driver name: kmod-atl1-1.2.40.3-3.el5.elrepo.i686


Saturday, May 22, 2010

Share Internet connection thru wireless adapter w/o using router.

This steps helps you share your internet connection (wirelessly) w/o requiring a router.

What you need:

a. Wireless adapter (most laptops have already a built-in one).

b. Windows 7 (Maybe applicable to Vista).

1. Go to your Network and Sharing Center (accessible through the Notification area or you can type on the start menu "Network and Sharing Center").


2. Make sure first that you have a wireless adapter installed by checking if there is a Manage wireless networks on the top left panel of the window - and then click Set up a new connection or network.

3. Choose Set up a Wireless ad-hoc (computer-to-computer) network.

4. Then click Next.

5. Enter your preferred Network Name or SSID / Security type / and Security Key.

In my example, I chose a No authentication (Open) so there's no need to fill up a Security Key. Then Click Next.

6. After the setup of the Wireless network, we need to share its internet connection. Click Turn On Internet connection sharing.

7. Wait just a sec after configuring then click Close.

8. Verify your Wireless network on the Notification area. Now you can share your internet connection wirelessly.


9. Done. Let me know if I missed something. Cheers!


Tuesday, April 27, 2010

Is Firefox really that bad on CentOS?

I'm still wondering why the heck Firefox in CentOS isn't good as it's M$ version. 

Several drawbacks I noticed :

1. Flash object loads intermittently, needs to refresh site several times to load (including YouTube videos darn it).

2. Fonts used by Firefox is really bad, imo.

3. Firefox frequently hangs on some website.

So I searched for a better alternative browser for CentOS, Google Chrome isn't in the list (no available rpm's, there's a workaround but still ain't stable) neither Safari (doesn't support my OS but should be installed on Wine or on a Virtualbox) and Swiftfox (doesn't work either).

And I bumped to Opera which the browser I also used in my M$ desktop. So far, it's more stable than Firefox except I get some hiccups when playing video on certain websites (not including YouTube).

And the last thing I like about it is... more viewable window! (My Lenovo S10 really lacks workspace, that's why).


Too bad 10.51 full is not yet available on CentOS (only beta source). 

Once you've installed it and didn't liked it, you can uninstall :

#yum erase opera

or

#rpm -e opera


-pau


Monday, April 19, 2010

Frustrated about Linux's zip apps!

Well, I've been downloading files from the net that has a multiple split zip archive. ( .z01, .z02, zip, etc...) And I just found out that CentOS / RHEL has a limit when unzipping files greater than 4Gb!

I tried 'yum install p7zip' but still, no luck. 

There's also a blog entry with his workaround...

#cat file.z01 file.z02 >> filename.zip

#7za e filename.zip

but, still FAIL. Dang... I can't imagine that it would be this complicated just to extract a file.

I ended up extracting to my Win 7 desktop. boo!

If you have any solutions, please post. ("\(^____^)/")

-pau

Wednesday, April 14, 2010

Installing e-sword using Wine on CentOS

Last March, I've been a fan of open source programs and migrated my Lenovo s10 OS to CentOS Linux. So far, its been a pain in the butt when installing programs, specifically programs that needs to be compiled. 

Lately, I want to use any bible program that can read NIV texts but unfortunately, gnomesword or Xiphos, I think, do not support NIV because of copyright issues. BibleTime in other hand doesn't have any RPM's for CentOS / RHEL and needs certain dependencies which I really haven't figured out. 

(If you're thinking about PDF NIV bible, that's out of the option since it IS REALLY hard navigating or searching each verse and chapter on it.)

Then I stumbled upon Google and found out an NIV .bbl file on click here which is fortunately an e-Sword file.

  • e-Sword, btw, is not compatible in Linux so I have to Install wine. You can install it by opening the terminal > type "yum install wine".  If it doesn't continue, you need to install RPM Fusion click here
  • Download the e-Sword executable file from their site or might as well use an older version since I got problems on version 9. What I'm using right now is e-Sword 7.8.5.
  • Open Wine File on Applications > Wine > Wine File and specify the e-Sword installer and then install.
  • Once installed, you should probably noticed after executing it, you will see a blank text on its window. Open Wine Configuration on Applications > Wine > Wine Configuration and on Applications Tab - add e-Sword. Proceed to Libraries tab and choose from the New override for library drop down list, oleaut32.dll and riched20.dll. After, click edit on each DLL and choose "Native (Windows)" option on both.
  • Choose Ok and re-launch e-Sword. By now, you should see the missing texts

If you downloaded the NIV .bbl file from the recent link, you should paste it to the e-Sword folder from wine - the usual path should be /home/(username)/.wine/drive_c/Program Files/e-Sword. Use Nautilus for efficiency ( don't forget to press CTRL-H to see hidden files ).

-pau


Monday, April 12, 2010

Vista System restore error 0×80041321

Vista System Restore error; Could not create restore point

Error Message:
Could not create the scheduled task for the following reason: The task image is corrupt or has been tempered with. (0×80041321)


1. Delete System Restore entries on following registry path

HKEY_LOCAL_MACHINE\SOFTWARE\Microsoft\Windows
NT\CurrentVersion\Schedule\TaskCache\Tasks\


HKEY_LOCAL_MACHINE\SOFTWARE\Microsoft\Windows
NT\CurrentVersion\Schedule\TaskCache\Tree\


2. Delete file named "SR" on c:\Windows\System32\Tasks\Microsoft\Windows\SystemRestore

3. Reboot.


-pau

How to fix .NET errors in Windows

How to fix .NET errors (installing update) in Windows:


1. Download .NET clean up utility : http://blogs.msdn.com/astebner/attachment/8904493.ashx

2. Remove the specific .NET version that won't install in Windows Update. DO NOT REMOVE ALL VERSION.

3. Reboot

4. Most of the time, .NET 1.1 and 3.5 are common versions that fails to install. After reboot, download and install the .NET installers:

Microsoft .NET Framework 1.1

http://www.microsoft.com/downloads/details.aspx?FamilyId=262D25E3-F589-4842-8157-034D1E7CF3A3&displaylang=en

Microsoft .NET Framwork 3.5

http://download.microsoft.com/download/6/0/f/60fc5854-3cb8-4892-b6db-bd4f42510f28/dotnetfx35.exe


other versions are available at:

http://msdn.microsoft.com/en-us/netframework/aa569263.aspx


5. Reboot after, run Windows Update and .NET updates will now install.

Multiple Yahoo! Messenger in one PC.

Well, this trick is not new nowadays but I had rather share this just for fun.


1. Open the registry editor by going to: start> run> and type "regedit" w/o the quotes.
2. Navigate to HKEY_CURRENT_USER\software\yahoo\pager\test
3. Right click the right panel window, choose new> DWORD value> and type "Plural" w/o the quotes.
4. Modify the Plural entry by double clicking it, and enter value data "1" w/o the quotes.
5. Click Ok and close the Registry editor.

That's it! You can run multiple Yahoo! Messenger (any version as far as I know) app's and can log-in as many users in 1 pc.


-pau


Configuring my PL-DSL1 router

I just sabotaged my modem/router from PLDT model PL-DSL1. A 4year old modem/router of mine and I really need to share my internet connection to my laptop without buying a Dlink or Linksys router.

Here's how to configure the modem to Router mode: (btw, my modem's firmware is the default and the old one.)

1. Go to your LAN adapter and change it's IPv4 properties and use the ff IP addr:

 IP address : 192.168.1.2

 Subnet mask : 255.255.255.0

 Default gateway : 192.168.1.1

2. Press ok and go to your browser and type on the address = http://192.168.1.1

3. It should prompt you to enter the username and password for the modem. For username type "admin" and password "1234" (w/o the quotes).

4. Go to Wizard Setup and choose the following options:

Mode = Routing

Encapsulation = ENET ENCAP

Multiplex = LLC

VPI = 0

VCI = 100 ( Metro Manila area) or 35 ( Provincial area), and then click next

5. Next, IP Addresses, just choose Obtain IP automatically and Network Address Translation to SUA only.

Click Next.

6. Click Change LAN Configuration and enter this values:

LAN IP Address = 192.168.1.1

LAN Subnet Mask = 255.255.255.0

DHCP Server = On

Client IP Pool Starting Address = 192.168.1.33

Size of Client IP Pool = 32

Primary and Secondary DNS Server = 0.0.0.0

Click Finish.

You can now connect another UTP cable from the modem/router and simultaneously use internet connection on the router.

-----------------------------------------------

What if you would like to return to bridge mode? Dang...

1. Proceed to previous step 4.

2. Choose and enter this values:

Mode = Bridge

Encapsulation = RFC 1483

Multiplex = LLC

VPI = 0

VCI = 100 ( Metro Manila area) or 35 ( Provincial area).

Click next to finish the wizard.

(Don't forget to change again the IP on your LAN adapter to Obtain automatically.)

3. Open CMD (Run as admin if applicable) type:

ipconfig /release

ipconfig /renew

There you have it! 

-pau


at last!

I finally created my own blog... or whatever they call it.

So please welcome me and be nice.

-pau