For the NFS Server side:
1. Make sure you've installed NFS server by typing on the terminal:
- rpm -qa | grep nfs
This will show:
nfs-utils-lib-1.0.8-7.6.el5
nfs-utils-1.0.9-44.el5
system-config-nfs-1.3.23-1.el5
- chkconfig --level 35 nfs on
- service nfs start
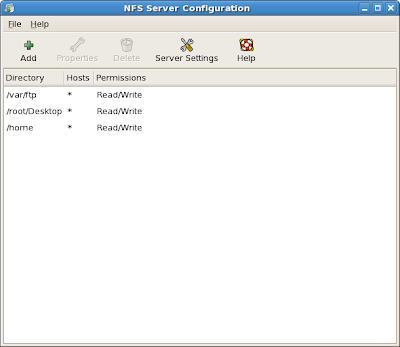
2. Go to System>Administration>Server Settings> NFS
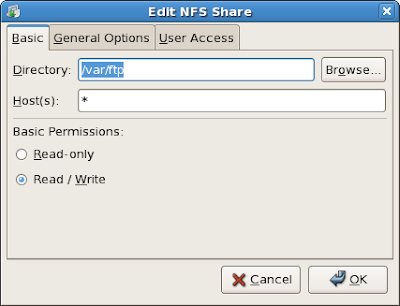
3. Click Add:

- in my example, I chose /var/ftp as the directory which I will share for the network and * for hosts (this will accept all client, best practice is enter the specific ipaddr and netmask e.g. 192.168.0.1/255.255.255.0) for testing purposes only.
- On User Access tab choose Treat remote root user as local root.

note: I also added some directories.
5. Now, on the tricky part...
NFS has a dynamic port assigned by the portmap... (so what does that mean?) You'll have difficulty filtering those port on the firewall.
So to do that ->
- gedit /etc/sysconfig/nfs
- uncomment or remove the # sign on these port configuration
LOCKD_TCPPORT=32803
LOCKD_UDPPORT=32769
MOUNTD_PORT=892
RQUOTAD_PORT=875
STATD_PORT=662
STATD_OUTGOING_PORT=2020
- Then save.
- service nfs restart
- service portmap restart
7. We're nearly done, now on to the firewall. Type on to the terminal "gedit /etc/sysconfig/iptables" and add these to filter those port that we just enabled.
-A RH-Firewall-1-INPUT -s 112.203.69.110/255.255.128.0 -m state --state NEW -p udp --dport 111 -j ACCEPT
-A RH-Firewall-1-INPUT -s 112.203.69.110/255.255.128.0 -m state --state NEW -p tcp --dport 111 -j ACCEPT
-A RH-Firewall-1-INPUT -s 112.203.69.110/255.255.128.0 -m state --state NEW -p tcp --dport 2049 -j ACCEPT
-A RH-Firewall-1-INPUT -s 112.203.69.110/255.255.128.0 -m state --state NEW -p tcp --dport 32803 -j ACCEPT
-A RH-Firewall-1-INPUT -s 112.203.69.110/255.255.128.0 -m state --state NEW -p udp --dport 32769 -j ACCEPT
-A RH-Firewall-1-INPUT -s 112.203.69.110/255.255.128.0 -m state --state NEW -p tcp --dport 892 -j ACCEPT
-A RH-Firewall-1-INPUT -s 112.203.69.110/255.255.128.0 -m state --state NEW -p udp --dport 892 -j ACCEPT
-A RH-Firewall-1-INPUT -s 112.203.69.110/255.255.128.0 -m state --state NEW -p tcp --dport 875 -j ACCEPT
-A RH-Firewall-1-INPUT -s 112.203.69.110/255.255.128.0 -m state --state NEW -p udp --dport 875 -j ACCEPT
-A RH-Firewall-1-INPUT -s 112.203.69.110/255.255.128.0 -m state --state NEW -p tcp --dport 662 -j ACCEPT
-A RH-Firewall-1-INPUT -s 112.203.69.110/255.255.128.0 -m state --state NEW -p udp --dport 662 -j ACCEPT
- First, change the ipaddr and netmask specified to your Server IP address. In my example I used 112.203.69.110/255.255.128.0 as my Server IP address.
- Second, add these lines before the...
-A RH-Firewall-1-INPUT -j REJECT --reject-with icmp-host-prohibited
- Save and restart iptables services by typing "service iptables restart"
Now on to the Client Side:
1. There's no daemon to start nfs client. Just make a directory on to the /mnt by typing "mkdir /mnt/nfs" (on this example I use nfs, you can enter whatever name here).
2. Then mounting the folder...
- type "mount -t nfs 112.203.69.110:/var/ftp /mnt/nfs"
- This will mount the shared folder by the server.
- make sure that you can see the portmap on the server by "rpcinfo -p 112.203.69.110" (or the IP address of your server).
- Repeat Step 5.
- make sure that there's no typo.
- disable the firewall.
Please let me know if you have any questions or any non-violent inputs :). Cheers!
No comments:
Post a Comment