Today, I'm gonna share how to setup a
basic Mail Server using Zimbra and Webmin for a quick DNS setup.
Zimbra is an excellent alternative for MS Exchange server and the best thing is... it has an Open Source edition, that means, it's free.
I'm gonna give credit to Wyatt Walter from his guide which is the basis for my DNS setup. Disclaimer: This guide is for testing and educational purposes only. This guide is not meant for a live production environment.
For my setup:
- I'm using a Centos 5.5 machine that is not optimized in Zimbra. (has sendmail, Apache, bind etc. on it)
- DSL connection with DHCP. Boo!
- A modem/router that sets up to routing mode.
- My local pc has a 192.168.1.36 static IP assigned.
- Internal DNS.
Setup DNS using Webmin:
1. Zimbra requires that you have a working DNS record. We gonna need
Webmin for Centos to setup a basic A (IPv4 Address) and MX (Mail Exchange) record.
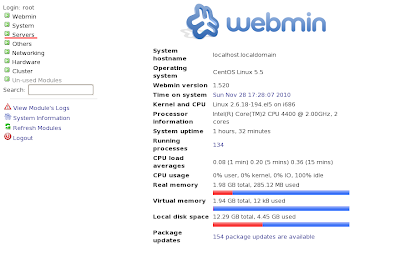
Webmin is a web-based configuration utility on Linux. I used Webmin version 1.520 for this guide.
- Make sure you have bind installed by:
#rpm -qa | named
bind-libs-9.3.6-4.P1.el5_4.2
ypbind-1.19-12.el5
bind-utils-9.3.6-4.P1.el5_4.2
bind-chroot-9.3.6-4.P1.el5_4.2
bind-9.3.6-4.P1.el5_4.2
#chkconfig named on
#service named start
2. Once installed, you can access it through your favorite browser and type the address 'https://localhost:10000'. Webmin usually listens to port 10000.
You can also use https://127.0.0.1:10000 or https://youripaddress:100003. On the log-in screen. Enter any root account (usually root) and the root password.
4. After logging-in. Click servers and then BIND DNS server:
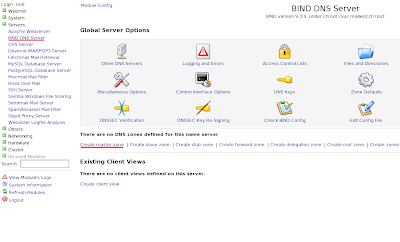
5. Then click Create master zone:
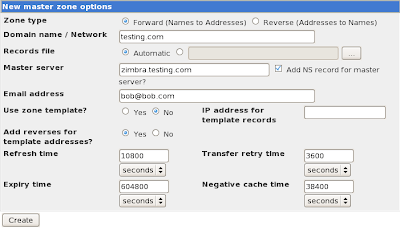
3 required fields:
domain name / Network:
testing.comMaster server:
zimbra.testing.comEmail address:
bob@bob.comYou can input your desired input on these fields.Everything else is default. Make sure you have those filled in then click Create.
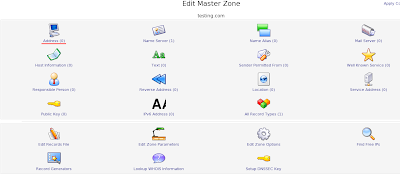
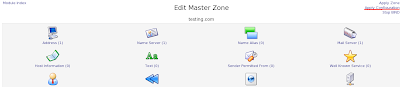
6. You will be redirected to the Edit Master Zone, Click Address.
7. On the Add Address Record, enter your master server name and then your machine's IP address.
- You can verify your IP address by typing on to the console:
#ifconfig
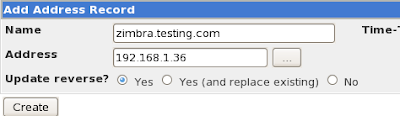
And then click Create, then click Return to record types.
8. On the Edit Master Zone, click Mail Server.
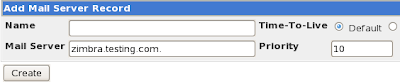
On the Add Mail Server Record, you can leave the Name blank and the Mail Server to your FQDN. Enter 10 on Priority.
on my example, I used zimbra.testing.com. Click Create and then click Return to record types.
9. On the Edit Master Zone, click on Apply Configuration.
make sure you started bind.
and we're done on the DNS part.
When installing Zimbra Open Source, it will look to the /etc/hosts file if it is properly configured with your IP address and FQDN.
To properly set-up your FQDN on
/etc/hosts...
#vi /etc/hosts
# Do not remove the following line, or various programs
# that require network functionality will fail.
127.0.0.1 localhost.localdomain localhost
::1 localhost6.localdomain6 localhost6
192.168.1.36 zimbra.testing.com zimbra
- You should add lines like these: IP address FQDN hostname
- Then save.
Now on to
/etc/resolv.conf#vi /etc/resolv.conf
nameserver 192.168.1.36
- You can enter your machine's IP address after nameserver.
After setting those up you can check if your DNS records are working fine.
#dig testing.com MX
; <<>> DiG 9.3.6-P1-RedHat-9.3.6-4.P1.el5_4.2 <<>> testing.com MX
;; global options: printcmd
;; Got answer:
;; ->>HEADER<<- opcode: QUERY, status: NOERROR, id: 10332 ;; flags: qr aa rd ra; QUERY: 1, ANSWER: 1, AUTHORITY: 1, ADDITIONAL: 1 ;; QUESTION SECTION: ;testing.com. IN MX ;; ANSWER SECTION: testing.com. 38400 IN MX 10 zimbra.testing.com. ;; AUTHORITY SECTION: testing.com. 38400 IN NS zimbra.testing.com. ;; ADDITIONAL SECTION: zimbra.testing.com. 38400 IN A 192.168.1.36 ;; Query time: 0 msec ;; SERVER: 192.168.1.36#53(192.168.1.36) ;; WHEN: Sun Nov 28 18:59:54 2010 ;; MSG SIZE rcvd: 82 #dig testing.com any
; <<>> DiG 9.3.6-P1-RedHat-9.3.6-4.P1.el5_4.2 <<>> testing.com any
;; global options: printcmd
;; Got answer:
;; ->>HEADER<<- opcode: QUERY, status: NOERROR, id: 36853 ;; flags: qr aa rd ra; QUERY: 1, ANSWER: 3, AUTHORITY: 0, ADDITIONAL: 1 ;; QUESTION SECTION: ;testing.com. IN ANY ;; ANSWER SECTION: testing.com. 38400 IN SOA zimbra.testing.com. bob.bob.com. 1290931620 10800 3600 604800 38400 testing.com. 38400 IN NS zimbra.testing.com. testing.com. 38400 IN MX 10 zimbra.testing.com. ;; ADDITIONAL SECTION: zimbra.testing.com. 38400 IN A 192.168.1.36 ;; Query time: 1 msec ;; SERVER: 192.168.1.36#53(192.168.1.36) ;; WHEN: Sun Nov 28 19:00:43 2010 ;; MSG SIZE rcvd: 126
#nslookup zimbra.testing.com
Server: 192.168.1.36
Address: 192.168.1.36#53
Name: zimbra.testing.com
Address: 192.168.1.36
Now on to the Zimbra part!
Setting up Zimbra Open Source Edition:1. Download the latest Zimbra open source edition at http://www.zimbra.com/downloads/os-downloads.html
or direct link
here.
2. Untar.
#tar -xvzf zcs-6.0.9_GA_2686.RHEL5.20101115233426.tgz
#cd zcs-6.0.9_GA_2686.RHEL5.20101115233426
3. Make sure sendmail and apache are stopped. (also dovecot or imap, afaik)
#chkconfig sendmail off #chkconfig httpd off #service sendmail stop #service httpd stop
4. If all works fine, we proceed to the installation, so I'm assuming that we're on the untarred directory of zimbra.
#./install.sh --platform-override
platform override option is for installing Zimbra on a CentOS machine.
5. After that, there will be some message initializing the installation and inspecting your machine. You will be prompted to agree on the license agreement. Just type 'y'.
6. Then it will check for prerequisite packages. If there will be packages not installed you can exit the installation and proceed to install those missing packages.
e.g.
#yum install sysstat
After installing the necessary packages you can revert back to previous step 4.
7. Moving forward, you will be prompt to install:
Install zimbra-ldap [Y] y
Install zimbra-logger [Y] y
Install zimbra-mta [Y] y
Install zimbra-snmp [Y] y
Install zimbra-store [Y] y
Install zimbra-apache [Y] y
Install zimbra-spell [Y] y
Install zimbra-memcached [N] y
Install zimbra-proxy [N] y
Just type 'y' and you will again be prompted to install on a CentOS machine (definitely yes).
8. On this time, the major installation will start and will finish just a couple of minutes.
after that, there would be an error regarding DNS resolving.
DNS ERROR resolving It is suggested that the hostname be resolveable via DNS Change hostname [Yes] y Please enter the logical hostname for this host zimbra.testing.com
Enter 'y' and I typed my FQDN which is zimbra.testing.com and then hit enter.
Yet another DNS error will show up (regarding MX records)
DNS ERROR resolving MX for zimbra.testing.com It is suggested that the domain name have an MX record configured in DNS Change domain name? [Yes] y Create domain: [zimbra.testing.com] testing.com
Just type 'y' and change domain. Mine is testing.com
9. Next, Zimbra will try to detect if there are services that are using the ports needed by Zimbra applications.
If everything else works just fine. You will be prompted to change the admin password.
This will be indicated by * (asterisk). If there are several asterisk indicated, there might be problem on your setup.
1) Common Configuration:
2) zimbra-ldap: Enabled
3) zimbra-store: Enabled
+Create Admin User: yes
+Admin user to create: admin@testing.com
******* +Admin Password UNSET
+Enable automated spam training: yes
+Spam training user: spam.nawjnedgk@testing.com
+Non-spam(Ham) training user: ham.d2q7jnymr@testing.com
+Global Documents Account: wiki@testing.com
+SMTP host: zimbra.testing.com
+Web server HTTP port: 80
+Web server HTTPS port: 443
+Web server mode: http
+IMAP server port: 7143
+IMAP server SSL port: 7993
+POP server port: 7110
+POP server SSL port: 7995
+Use spell check server: yes
+Spell server URL: http://zimbra.testing.com:7780/aspell.php
+Enable version update checks: TRUE
+Enable version update notifications: TRUE
+Version update notification email: admin@
+Version update source email: admin@
4) zimbra-mta: Enabled
5) zimbra-snmp: Enabled
6) zimbra-logger: Enabled
7) zimbra-spell: Enabled
8) zimbra-proxy: Enabled
9) Default Class of Service Configuration:
r) Start servers after configuration yes
s) Save config to file
x) Expand menu
q) Quit
Choose 3 for zimbra-store then 4 for admin password.
Type the new password for the admin and when finished, type 'r' to return to menu then type 'a' to apply settings.
You will be prompted again with questions. Just agree on that.
10. After configuring the password, it will continue with the setup. Wait a several minutes then you will be prompted again:
Notify Zimbra of your installation? [Yes] n Notification skipped
Just type 'n' to skip notification.
11. Then it will initialize the servers and proceed to the post installation procedures.
If you have prompted on failed zimlets installation i.e.
Installing common zimlets... com_zimbra_cert_manager...done. com_zimbra_url...failed. This may impact system functionality. com_zimbra_ymemoticons...done. com_zimbra_email...failed. This may impact system functionality. com_zimbra_date...done. com_zimbra_adminversioncheck...done. com_zimbra_dnd...failed. This may impact system functionality. com_zimbra_phone...failed. This may impact system functionality. com_zimbra_bulkprovision...done.
You can install this on the admin page after. Then you will be prompted that the installation is done.
Configuration complete - press return to exit
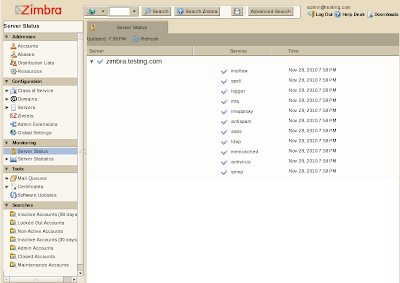
12. And now you're done with the installation. Now you can access the admin page through your favorite browser and type the address https://zimbra.testing.com:7071 or https://localhost:7071 or https://youripaddress:7071.
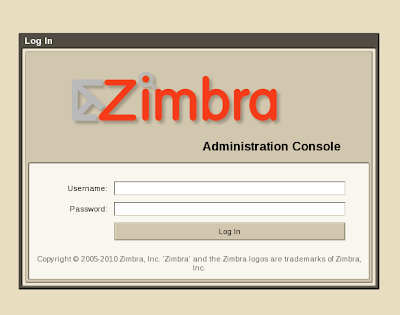
Then enter the username (default is admin) and then the password you supplied earlier.
 If you can't access the admin page, probably Apache is running. Just stop the service and restart.
You can also access the web client interface. Just replace the https to http i.e. http://zimbra.testing.com
Done. ^_^
Let me know if I miss something. Cheers!